The Probat UG22 Exhaust Fan Bearing Replacement How-To You've Been Waiting For
- joeydolin
- Feb 14, 2025
- 11 min read
Updated: Feb 23, 2025
Unfortunately, yes, there are several bearings that make up the Probat UG22 (our unit is from 1956). Similar to my previous learning experience aka nightmare dealing with the front bearing, when the exhaust fan's inner bearing (probably not the technical word for it) started making that same got dang screeching/yelling noise, I knew what exactly my January would look like.
This bearing is unfortunately more complicated to access than the front bearing, but with the right tools, help, and confidence, it's not too bad. (Be mindful as you go! This machine is sturdy and chonky, but damaging any of this 60+ year old German fabricated machinery won't likely be easy or cheap or fast to replace..)
Some quick shout outs:
Without the help from Jacob at BD Mack here in Portland, we'd be stuck roasting on a stovetop oven. Not only has he done installs and maintenance for Stumptown's Portland Roastery, but he runs his own co-roasting space also, called RoastPDX.
McGuire Bearing has all the bearings and grease your heart can dream of.
Probat USA is super helpful as always.
Also, I left Doug Graf and Liz Bishop of Vintage Coffee alone this time around, but they are some of the most knowledgable, generous and patient people I know, and they can answer every single roaster maintenance question you'll ever think of.
If you're reading this, here's the bearing you're unfortunately about to replace. Keep in mind my roaster is a 1956 Probat UG22, so if you have a different year or model, there might be some differences.

I forgot to take a video of this exhaust fan bearing making a noise, but it was similar to the noise that the front bearing made when it seized up in the past, except less whistle-y and more freight train-y. (Fast forward to 0:40 in this classic video)
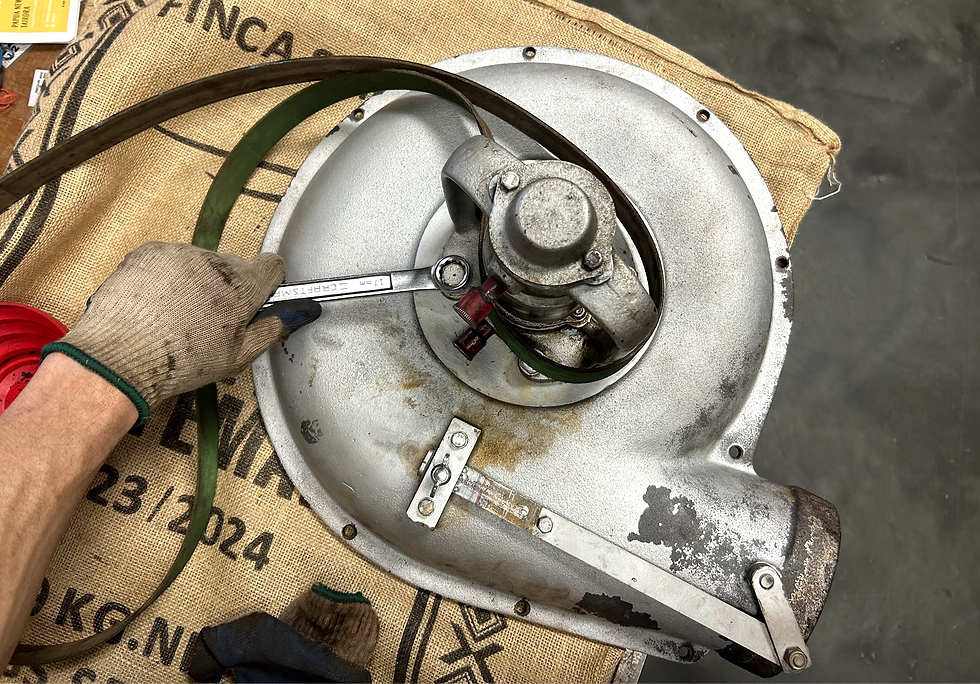
The first thing you can optimistically try do when you hear the bearing screaming at you is use these grease caps to inject more grease into the bearing. In my inexpert opinion, if you're hearing signs of a busted bearing, adding more grease will be, at best, a bandaid solution, delaying the inevitable bearing replacement. In fact, this is exactly what I did. Since Jacob was out of town for a few weeks, a bandaid solution worked great. I removed the bearing assembly from the fan cover (from 9 to the left in the image below), which exposed one side of this inner bearing, allowing me to kinda clean it, and then I repacked it with fresh grease and reinstalled it. It stopped screaming at me so much when I turned it back on, so I felt good using it without causing further damage to the Probat.

Here's what it looked like once I removed this from the fan cover:

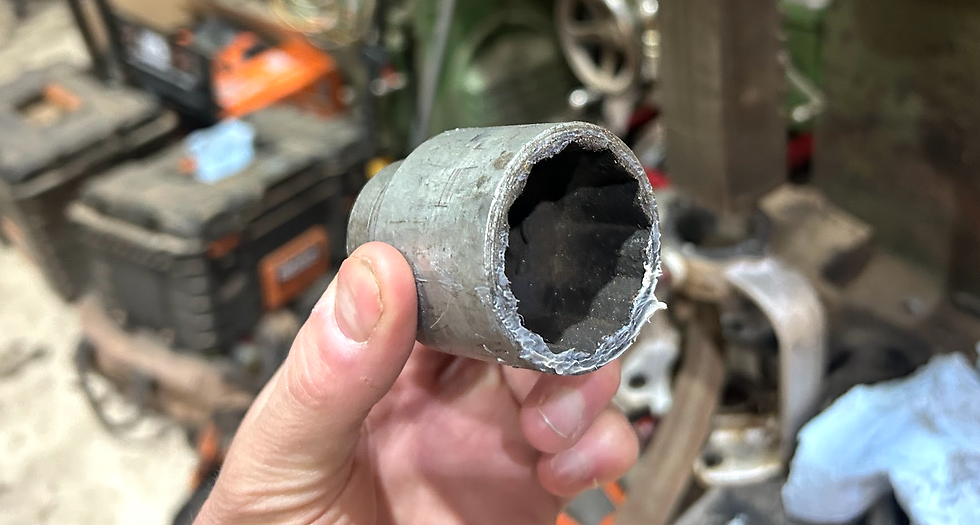
Maybe can't tell via a photo, but here's the grease that was caked on the outside of this bearing. I was able to break it apart, and it had a sludgy texture somewhere between mud and play doh.

Here's how it looked after removing that chonky layer of grease:
I cleaned it with a toothbrush and Simple Green, using an air compressor to do my best to blow/dry out all the Simple Green once it looks clean enough:
After I did my best to clean it this way, I repacked some grease in it, reinstalled it all back together, and added about a grease cap's worth of grease (red circle in photo below) every day until Jacob was back in town to really fix things. Note that, despite this bearing showing signs of needing replacement (specifically, it yelling at you when turned on), it continues to spin. If your bearing is in worse condition to the point where it does not spin, do not use it. Wait until you replace it before using the roaster again.
(Double check this, but I use Simple Green because somehow this chemical is 'food safe', but unlike the front bearing, this bearing does not run the risk of contacting the beans, so you can use something more heavy duty to clean the bearing. My buddy Kyle Rohling over at Queen City Coffee Collective suggested carburetor cleaner, which might be effective. Jacob shared that diesel can also be used if the bearing has been removed and you can submerge it.) Maybe a wasteful mindset, but if you're going through the trouble to remove it, it might save you a future headache to just replace it instead of trying to clean it with toxic stuff.

Also - and this is important - if after trying to do this bandaid approach, it continues to scream at you when turned on, it might be better to shut it down and find a back up roaster until you can really fix things. Continuing to use it might cause major damage to the machine.
Here's the grease I used. For more details on this grease, scope my blog post about the front bearing: In addition to this, make sure you have backup bearings ready to go. There are two bearings in this assembly, the inner one is slightly larger than the outer one. Here's the bearings you'll need (I use Nachi brand.)
Inner: 6305 C3 THBB02 Outer: 6304 C3 THAE03

I'll walk you through all the lil steps to actually remove these parts, but for reference and some foreshadowing, here's a diagram showing what you're left with once you remove the bearing/belt assembly from the bearing cover:

First step is to remove the exhaust fan cover. On our unit, there's a couple other parts attached to this cover (the belt safety gate and the exhaust pipe) that need to be removed prior to removing the fan cover:

Step 1 and 2 can be swapped. But assuming you go in the order in the image above, start by removing this gate by unscrewing all the bolts circled in red. Then, remove that exhaust pipe which is attached to the exhaust fan, outlined in yellow. Finally, you can unscrew all the lil bolts that are holding the cover in place. Ask someone (or in my case, two people) to hold the fan cover in place as you loosen and remove these bolts circled in blue. It's heavy as all heck, and dropping it would destroy your toe and the cover would also probably break.
Here's our airflow damper, which attaches to this fan cover. You won't need to remove it, but I'd recommend taking a picture of it so you can do your best to put it back to it's original setting/placement when everything is fixed up and put back together. Or, if you have a manometer to help you measure airflow, that's even better.

Once removed, here's what you're left with. Note that the belt is still attached. You're gonna have to be careful not to get this snagged on anything throughout the entire process.

Here's the birds-eye view. You can remove these bolts now or after you remove the fan blades. Choose your own adventure!
View from the other side:

Next up, we're going to remove the fan blades. Start by unscrewing these bolts (step 1 below) and then loosen that center bolt (step 2 below):

Loosen them evenly! Loosen one a lil bit, stop, loosen the next one a lil bit, and repeat going clockwise or counterclockwise. Once all a lil loose, finished removing them. (Do this same kinda thing when reinstalling it later.) Once removed, you can pop the blade right off, then loosen that center bolt circled in blue above.
Then you're left with this. Gently and evenly pop off this top hat looking thing:

Now, the bearing assembly should detach from the fan cover:

Give it a clean, and be sure to not lose this lil key thing that's sitting in the shaft (circled in blue). You'll need to remove this eventually, so I'd recommend removing it now. Next, you'll remove the bolts circled in red:

After removing those bolts, the plate should gently pop right off, exposing your embarrassingly unmaintained bearing:


That key that's sitting in the shaft (which I just recommended that you remove) helps the assembly all sit snug together, as seen in this groove in the fan blades:

On a side note, if you haven't already been doing so, label and organize all this crap as you go:

Now comes the even more stressful part - we're gonna disassemble the entire bearing assembly. You absolutely need a bearing press. Jacob brings up a good point that you can use a manual press or a hydraulic press, but one benefit to the manual press is that you can get a good feel as to whether you're forcing something too much, giving you the info you need to let you know if you might be causing some damage, whereas with a hydraulic press, you're a little less in tune with what's goin on.
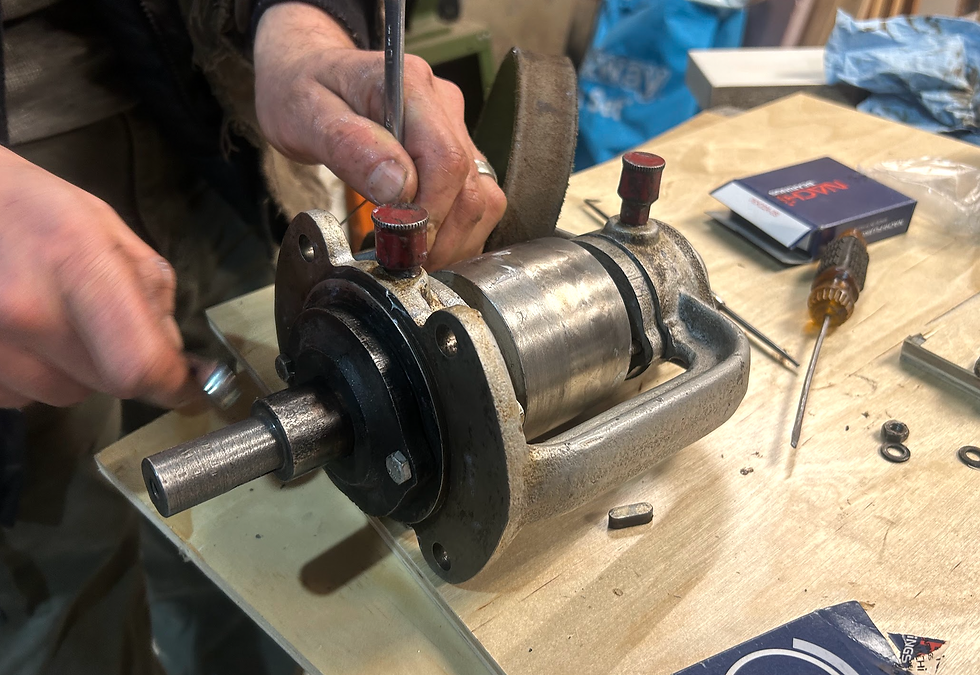
Start by removing the outer bearing cover by removing these bolts (located on the opposite side of the assembly). You'll have to hold the nuts at the other end of the bolts, and they're a little tough to access, but you got this:

This'll expose a couple jam nuts keeping things snug, which we'll remove next:

I couldn't do it with my bare hands, which is a good sign, since they're jam nuts, so we used this tool. Remove them one at a time.

Just in case this is helpful:

Next up, we use the press to disassemble the bearing assembly. If you've never seen or operated a press, get some help. Otherwise, you basically pull a lever to apply pressure to push things. Be careful with the belt and be mindful not to force something too much and cause a bigger bummer!

We had to figure out which direction to push the shaft through the assembly. In the image above, we tried pushing it one direction, but we ultimately ended up flipping it around to push the shaft towards the direction of the busted bearing. Maybe either way would work, but I ain't sure.
We pushed it out like this, with the busted bearing toward the bottom:

We used these big metal plates to create a small gap/hole through which to insert the shaft. These plates supported the rest of the assembly while allowing the shaft to push through.

With this press and it's chonky presser (not a technical term), once the shaft was pushed to the same level as the assembly, we had to use a socket (like the ones you'd get in a socket wrench set like this) to help us continue pressing.


Keep pressing until it all falls out. We put some rags down on the ground for it all to fall on so it doesn't get damaged:

You're left with this, and these plates should come right off:

Now, remove is the outer bearing. Once again, we used a socket to help our chonky press make contact with the bearing to press it out:


Final step for the disassembly stage is to remove the busted bearing. Make sure to remove both of these keys on the shaft. You might have already removed the one circled in blue by this point, but be sure to remove the other one circled in green. They pop off with a screwdriver and slight nudges with a hammer.

By this point, it's a simple press (note the orientation of the shaft):

Now you can lay everything out (not everything shown below):

The red arrows are pointing to the two bushings/spacers, which help hold this big part in place. Clean em before reinstalling everything.
We took this opportunity to gently clean the shaft to remove any lil bits of crust or rust. I forgot to take a pic, but we spun the shaft on a lathe and used 400 grit sand paper. You likely don't need a lathe, but if you got one, it makes it a lil easier.
Here's the old bearing on the right, next to the new bearing on the left. Note how much hardened grease remains on the backside of this old bearing despite me trying my best to clean it with Simple Green while it was still replaced:

Grab a beer or a coffee or some lunch, or just go straight into reassembling everything. Step one here is to pack the new bearing with grease. Jacob recommends this effective, but messy, approach. Put some grease on your palm, and with your other hand, push the bearing into the grease pile, squeezing grease into every little cavity of the bearing, ideally from one direction only:

To reassemble everything with the press, do what you just did, but in reverse. Start by getting that bearing back on the shaft:

Once this is in, there might by several approaches to getting everything back on in the correct order. We struggled a little bit trying to wrap our heads around it, but we started by installing the outer bearing into the assembly:

It's super important that the belt ends up on the correct side of the shaft assembly! Refer to previous photos, and use a zip tie or, in our case, some metal wire, to keep it in place. Triple check it's correct, otherwise, you'll be very bummed when you try to put it back onto the roaster, and realize the belt is in the wrong place.
Note the orientation of the belt, and use the grease caps as helpful visual references, to determine which side to tie the belt to during the reinstallation process. This is the side we tied the belt to:

We had to use a couple different sockets to push this bearing in:

Then we put one of the bushings back in place, laying it on top of the bearing we just pressed in:

We applied some anti-seize inside this part which holds the belts, which helps keep things operating smoothly.


This is where I felt like I was trying to figure out one of those metal puzzles you'd get as Christmas gifts from your aunts and uncles who didn't really know what to get you. Unless that was just me? But, you kinda just do your best to get everything in it's place, and ready to press. In the picture below, the key on the shaft is not installed yet, but we realized after taking this picture that we had to have it in there at this stage in order to press everything into place. (To replace the key, place it into its groove, and gently tap it with the handle of a screwdriver.)

If you end up with something that looks like this, good job!

Now, reattach the outer bearing cap, as well as that plate that we removed a while back:

Replace these two jam nuts, one at a time (red arrows in image below). If done correctly, the friction between these two jam nuts will prevent any possibly loosening. Tighten the inner nut, then with full torque, tighten the outer nut against the inner nut.


Now, what should at this point be the easy part - put it all back onto the machine. Start by attaching the bearing assembly to the fan cover with these bolts in red (two circled in red, the other two hidden behind the bearing assembly. (Our roaster also has this black metal attachment which is how the belt cage attaches to everything. Yours might not have this.)

Put the top hat looking thing back onto the fan blades, tightening each bolt evenly as you go:

Attach the fan blades to the fan cover and bearing assembly:

Put the cover back onto the roaster by tightening these lil bolts circled in red (not all shown in picture). If you screwed up the belt's location when pressing it all back together, this is the time you'd be extremely bummed. Good thing you attached it to the correct side!

Gently reattach the belt to the other pulley, put the safety cage back on, cross your fingers, and turn things on. Make sure to fill those grease caps with grease, and give them about a 1/4 turn every time you roast. The theory here is that the fresh grease you add every day will push/flush out some of the older grease, ideally keeping the bearing filled with healthy grease.
Hope you never have to read this, but if you do and have more questions, hit me up on IG @roastinjoe.


Comments