How I (Re)Replaced the Front Bearing on my Probat UG22
- joeydolin
- Nov 21, 2021
- 11 min read
Updated: May 13, 2022
UPDATE: About 6 months after this installation, this new bearing also stopped turning, and I had to buy yet another bearing and do this repair a second time! (Good thing I had this blog post to refer to!) After chatting with some bearing experts and the extremely helpful guys at Probat USA, I've concluded that I either used the incorrect type of grease, or did not clean and re-grease the bearing as often as I should've. So, as you read through this, please note that any edits and additional information that I learned while doing this for a second time are in purple. I hope my mistakes will help you avoid making the same mistakes as me!
What I did differently this second time around was I used a grease with a higher temp rating and spent more time researching the correct amount of grease to apply to the bearing. I also learned that the bearing housing on my machine was missing a felt ring, so I installed that as well. Lastly, I sent even more emails to Probat USA for help.
Probat has been making newer models for years, but I have now worked with two different UG22s at two different companies. This leads me to believe that there are a lot of these clunky, stress inducing, incredible machines still out there being used on the daily.
If you are one of those people who is lucky and unlucky enough to be roasting on one of these machines, you may be like me and have struggled to find some solid resources for maintenance and troubleshooting. I gotta shout out the team at Probat USA, specifically Charlie and Andy, for all their help and for answering my countless emails.
Anyways, here is a walkthrough on how I replaced the front bearing on my UG22. This info is based on my conversations with Probat USA, Wrecking Ball Coffee Roaster's blog post about doing this same thing on their L12 (https://medium.com/@nickcho/replacing-the-front-bearing-on-a-probat-l12-coffee-roasting-machine-32d9354b55f1), and my recent traumatizing experience(s) doing it myself. I am not affiliated with Probat USA, Wrecking Ball Coffee Roasters, or Diedrich. I am no expert, so this post is merely a description of my experience and is not intended to be advice.
Wrecking Ball's blog post is incredibly informative, and I highly recommend reading that post if you are planning on replacing your front bearing. Everything it describes almost directly applies to the UG22 (with a couple small differences), but since I was unable to find this info for the UG22 specifically, I thought my experience may be helpful for some of you UG22 operators. I'll also share some mistakes that I made and strategies that I learned along the way.
So, to begin, make sure your replacement bearing is ready to go (you can buy these from Probat USA or a legit bearing shop), and that you have all the tools and some high temp food grade grease (I bought mine from Diedrich - I, hopefully correctly, assume this grease will work just fine for my Probat). I got my bearing from McGuire Bearing Company for about $100. All they needed to know was this info: "1211 ETN9". Based on my experience the first time doing this, I DO NOT suggest using this Diedrich grease.

Shiny new bearing straight from Probat USA. (They do not fabricate this part, but they can sell it to you.) If you buy a bearing from a bearing company (the cheaper option), they'll need the info written on that outer race (1211 ETN9).

Pretty sure what's important is that the grease is high temp and food grade and synthetic. To be fully transparent, when I initially did this repair, I called Diedrich and asked them if this particular grease would work for the front bearing on my UG22. They said yes, so I trusted them. Not sure if I simply did not clean it regularly enough, or if there are significant design differences between a Probat and a Diedrich that make this grease not compatible with a Probat. Either way, below is a picture of what the bearing looked like after about six months when this grease hardened up, causing the bearing to stop turning.

I'm triggered!

Here is what the housing looked like once I removed the bearing.
I'll start with the tl;dr version: Remove the bearing housing and bearing at the same time. Next, remove the bearing from the housing. Then, clean everything and grease some parts, and then add only the bearing housing back to the roaster. Once the housing is in place (or partly in place, I'm not sure exactly how much in place it needs to be), install the new bearing and pack it with grease (careful not to add too much - more on this later). For my second bearing installation, I screwed the housing all the way back to it's original, operable position before adding the bearing. Put all the other parts back on, cross your fingers, and turn on the machine! This time, no need to cross your fingers because you're gonna do it perfectly!
Step 1: Regularly clean and repack your front bearing with grease so you never have to do this. How often depends on how much you roast..
Here's what he guys at Probat USA recommend:
Check the bearing every two months and re-grease.
Change the bearing every two years or after 2000 hours.

The original manual recommends doing this once a year.
Probat USA has a great video for cleaning a bearing: (https://www.youtube.com/watch?v=1uPSB7aT5Y4). If you slack on this maintenance, you may one day hear a noise like this coming from the front of your roaster.
Turns out my bearing was not working whatsoever and the center shaft was grinding along the inner ring (technically called a race, not a ring) of the bearing. This can't be good, as I'm guessing this added a bunch of strain to the system.

Not sure if this particular bearing has ever been cleaned.
Step 2: Remove the bearing cover.
Unscrew the three bolts with a wrench and then chisel this cover off. I used a putty knife and a hammer. Your putty knife has to be thin enough to fit between the bearing cover and the ring with notches (aka the bearing housing.) In this post I refer to this piece as the 'bearing housing' or just 'housing'. Chisel one side a little, then do the other side a little, and repeat until it is removed gently, with your gentle but assertive hammer taps. (I put a little plastic bin with towels on the cooling tray under the bearing, so if any of these heavyish parts fall down, they land in a nice soft and safe area!)

Bearing housing on the left, bearing cover on the right.

Putty knife chisel.
Step 3: Remove the snap ring.
This ring keeps the bearing in place. Use snap ring pliers to remove this ring, but you can get creative by using vice grips with small nails, or something else. The second time around I used a couple small flathead screwdrivers. Make sure your snap ring pliers are the correct size. If they are too small then they will not work.

Step 4: Remove the bearing housing.
First, use a wrench to remove that small rectangular slab of metal that prevents the bearing housing from moving.

These photos were taken out of order, and the bearing cover happens to still be on in this picture.
Then, use the spanner tool to screw the bearing housing counter-clockwise.


Yer done unscrewing when you can see all of the threads on the bearing housing.
Step 5: Use the puller tool to finish removing the bearing housing.
The spanner tool only does so much, and good luck pulling the bearing housing off with your hands.


It's like a metal alien parasite or something.
As seen in the picture, the center shaft is hollow on the UG22 (this is one of the differences between the UG22 and the L12)! I used two washers to cover the hole and provide the puller tool with a surface to push on. You can get creative with exactly what you use - you basically just need to cover the hole with a sturdy material without getting in the way of the bearing housing as it is pulled out. I used a ⅝ inch washer stacked on a ¾ inch washer. The ¾ inch washer was large enough to cover the roaster's center shaft hole, and the ⅝ inch washer's hole was small enough to catch the puller tool. So, I stacked the two washers and it worked perfectly.

Unstacked washers, stacked washers.
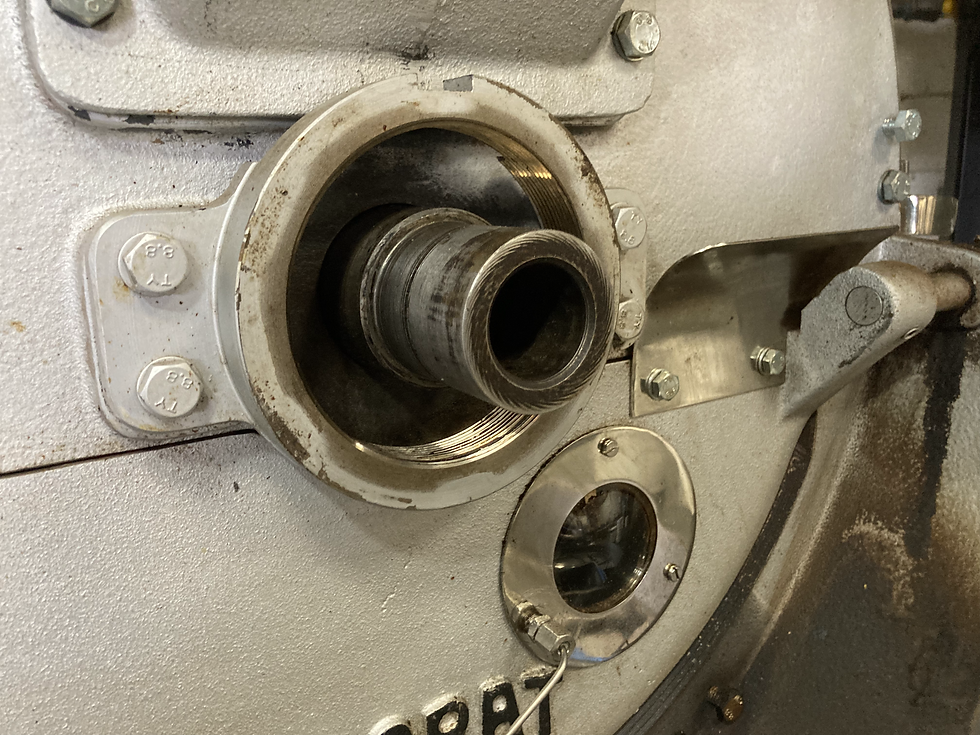
Naked Probat.
Step 6: Remove the old bearing from the housing.

Note the distance from the front of the bearing to the front of the housing. When putting in the new bearing, you will want to reference this! Also, you will know that the housing and bearing are in place when you can see the snap ring groove on the drum shaft when they are back on the roaster.
Apparently you can just use a piece of wood to force the bearing out somehow, but this definitely worried me. The risk of destroying the old bearing without being able to fully remove it from the housing was the most uncertain and stressful part of this process. A broken bearing means a broken roaster, and for a coffee roasting company, this would be catastrophic. I was very much stressed out, yes. So, I bothered all of my coffee friends, sent a bunch of emails to Probat USA, called some bearing stores, and eventually found my way to a local tool shop. Hall Tool Company, I highly doubt you'll ever read this, but THANK YOU SO MUCH!

Hall Tool Company used this shop press to remove the old bearing almost instantly. If you live in Portland and ever need tools, go support these dudes!
Step 7a: Clean the housing and throw the old bearing away (or keep is as a backup if it's still decent).

Shiny clean housing next to the old bearing. I may have lost some sleep over how to remove these two, and I was still angry with them when I took this picture.
(Use food safe cleaner btw)
Step 7b: Install the felt ring into the bearing housing. (Your's may already have this.)

The felt ring. I bought this from Probat USA. The purpose of this ring is to keep the grease in the housing.

The tip of the pen is pointing to the groove where this felt ring should be inserted.

Probat USA recommended placing this ring on a smooth surface, and filling the center with vegetable or machine oil so the felt can soak it up, making the installation easier. DO NOT use WD40 or similar products which may cause this ring to become brittle.

Here is the oil I used. (It's the same oil I use for the gearbox in the back!)

Felt ring nice n snug!

From the other side!
Step 8: Replace the bearing housing.
The order is important here. First put the housing back onto the roaster without the new bearing, and then add the new bearing. Do not put the new bearing into the housing prior to putting them back on the roaster. I did this, and I had to go back to Hall Tool Company and embarrassingly ask them to remove the new bearing this time. The problem was that with the bearing in the housing, we were unable to get the housing threads to catch the threads on the roaster. Somehow the bearing was inhibiting us from getting the housing close enough for the threads to catch.

Use the spanner tool to screw the housing back on - without the bearing! How much should you screw it on before adding the new bearing? I don't know, but I screwed it about ¾ of the way on. (Once the new bearing was in the housing, I finished screwing it into place.) For my second time around, I screwed the housing on all the way until it was in its original, operable position before adding the bearing.
Step 9: Grease things to make it easier to slide the new bearing on.
Pack grease into the backside of the new bearing. Apply a thin layer on the inner surfaces of the housing, around the center shaft, and the inner surface of the inner bearing race. Actually, DO NOT grease the inner surfaces of the housing, around the center shaft, or the inner surface of the inner bearing race.
At McGuire Bearing, I was told that bearings should be filled only about 30% with grease. Also something about how adding too much grease can cause issues down the line. The second time I did this, I essentially copied that video I mentioned above: https://www.youtube.com/watch?v=1uPSB7aT5Y4

Take two!

Back of the tube!

All the info!

I added a lil bit to the backside of the bearing prior to installation.
Step 10: Install the new bearing.
What did not work: I placed the new bearing on the end of the center shaft. I cut a 2x4 and put it flush with the new bearing and began hammering. This pushed the entire drum back about ½ inch which almost gave me a panic attack. Luckily, as I unscrewed the housing with the spanner tool, the drum moved back to where it should be.
What actually worked: After placing the bearing on the end of the center shaft, I used a hammer and a piece of metal pipe to get the bearing situated into the housing.

Begin the bearing installation! Note all the grease which may or may not have helped. As I mentioned earlier - this is too much (and potentially the wrong) grease in this picture. Also, note the visual differences between this grease, and the new grease in the photo above.
At this point, I used a hammer to gently tap the bearing's inner race. Small, gentle taps evenly spaced around the race with the goal of sliding the bearing on evenly. Be super careful to not hammer the balls! Once the bearing is flush with the center shaft, I used a piece of metal pipe to finish hammering/tapping the bearing into the housing.

If you do this, make sure the pipe only sits on the inner race of the bearing and does not touch the balls. W.C. Wink's Hardware happened to have this perfectly sized scrap piece of pipe lying around.
After every few taps, I opened the discharge door to make sure the drum has not moved back at all by noting the gap between the drum and the front of the roaster. Once the bearing made contact with the housing, I began to carefully hammer/tap the outer race as well. Remember when you took note of the distance between the front of the old bearing to the front of the housing? Make sure the new bearing is in the same position as the old bearing was. You can also reference groove in the center shaft where the snap goes. If it looks like the snap ring will fit back on, then my guess is the bearing is in a good spot.
Apparently you can use some kind of sandpaper to smooth out the center shaft to make this easier. I also read that, for bearings in general (my sources, aka Youtube videos, did not mention Probat bearings) you can apply heat to the bearing to make it expand slightly, making it easier to push into place. I do not recommend these because I have no first hand experience trying them. If you want to do something like this, I'd definitely check with Probat USA first.

New bearing is nice and snug. Now finish screwing the housing into place with the spanner tool if you haven't already done so!
Step 11: Pack with grease.
Pack the front of the bearing with grease as you should have been doing as part of regular maintenance. According to McGuire Bearing, fill the bearing 30% - no more, no less! I think this comes out to about 5-6ish ounces.
I turned on the roaster at this point to see how things looked.

Here is what the new, installed, greased bearing looked like before putting the cover back on. I sent a picture of this to Probat USA and they gave me the thumbs up that it looks good!
Step 12: Replace the snap ring, bearing cover, and that rectangular piece of metal that prevents the bearing housing from moving. Turn on the roaster and cross your fingers.
Step 13: Have a beer and this time, actually never do this again, and remember these maintenance suggestions straight from Probat USA:
Check the bearing every two months and re-grease.
Change the bearing every two years or after 2000 hours.
Btw, I hope that if you referenced this post (pre-purple note version) for your front bearing replacement, you used better grease than me, and the appropriate amount of it! If not, I hope you still have time to remove the bearing cover, clean out the grease, and add some of that good stuff in there before your bearing gets damaged like mine did and you have to do this all over again!


Hey Joey,
Thanks for creating this record for all to use. Here it is, the week before Christmas 2023, and the front bearing on our UG-22 decided to start acting up. Though I've worked around these machines for a couple of decades now, I've never had the pleasure of swapping out a bearing. Thanks to you (and to Arno H. for pointing me in this direction) a couple of us were able to attack this problem with greater confidence. In the process, we found out the grease we had been using to lube the bearing was probably not rated for the this temp, which lead us to discover a local resource for the appropriate lube and for these exact…